This post is for those who ever wanted to learn programming but felt intimidated by complex syntax and cryptic error messages. Don’t worry, you’re not alone. Traditional programming languages like Python, C++ or Java can be overwhelming for beginners, with their strict punctuation rules, semicolons, and compiler errors that seem written for experienced developers.
Thus, RAPTOR serves as a visual programming environment that takes an entirely different approach to teaching programming concepts. Instead of typing lines of code, you create flowcharts by connecting graphic symbols. It’s programming, but not as you know it.
Why RAPTOR?
RAPTOR (which stands for Rapid Algorithmic Prototyping Tool for Ordered Reasoning) was designed with beginners in mind. Here’s why it’s an excellent choice for learning programming fundamentals:
Minimal Syntax – You won’t spend hours debugging missing semicolons or mismatched parentheses. RAPTOR handles the syntax so you can focus on logic.
Visual Execution – Watch your program run one symbol at a time, following the arrows as instructions execute. This visual feedback helps you understand exactly how programs flow from start to finish.
Beginner-Friendly Errors – When something goes wrong, RAPTOR’s error messages are designed to make sense to new programmers.
Focus on Algorithms – The goal is to teach you how to think like a programmer and design algorithms, not to master the intricacies of a commercial programming language.
The Building Blocks: RAPTOR Symbols
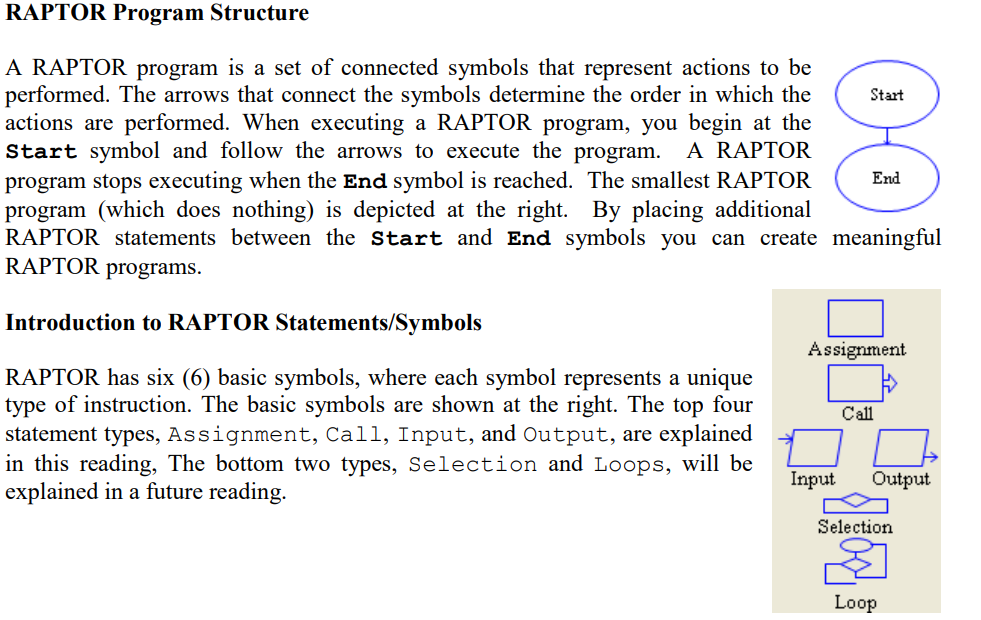
Every RAPTOR program consists of connected symbols, each representing a specific type of instruction. The arrows between symbols determine execution order. You start at the Start symbol and follow the arrows until you reach the End symbol.
RAPTOR uses six basic symbols, but as a beginner, you’ll work primarily with four:
Input Symbol
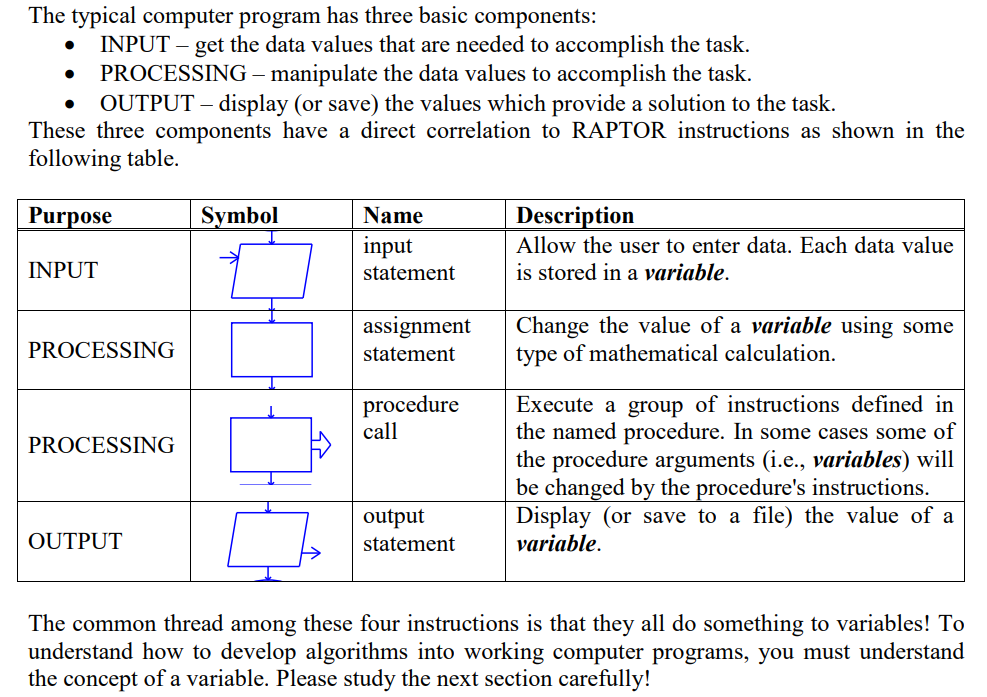
This symbol allows users to enter data while the program runs. When creating an input statement, you specify a prompt that tells users what to enter. For example: “Enter the temperature in Fahrenheit:” The value entered is stored in a variable for later use.
Assignment Symbol
The workhorse of programming, assignment symbols perform calculations and store results. They use the syntax: Variable ← Expression
For example: Area ← Length * Width
One assignment statement can only change one variable – the one on the left side of the arrow. Variables on the right side are used in the calculation but remain unchanged.
Output Symbol
This symbol displays results to the MasterConsole window. You can display simple text, calculated values, or combine both. Good programming practice means displaying results in a “user-friendly manner” – with explanatory text, not just raw numbers.
Instead of just: 2.5678
Use: Area = 2.5678 square inches
Call Symbol
Procedures are named collections of instructions that accomplish specific tasks. When you call a procedure, your program pauses, executes that procedure, and then resumes where it left off. You need to know the procedure’s name and the data values (arguments) it needs.
Understanding Variables
Variables are the heart of any program. Think of them as labeled storage boxes in your computer’s memory. Each box holds one value at a time, but that value can change as your program runs – hence the name “variables.”
In RAPTOR, variables are automatically created when first used. They can store either:
- Numbers: like 42, 3.14159, or -7
- Strings (text): like “Hello, world!” or “Enter your name”
When naming variables, follow these rules:
- Start with a letter
- Use only letters, digits, and underscores
- Make names meaningful and descriptive
Good examples: tax_rate, distance_in_miles, sales_tax
Poor examples: a, milesperhour (hard to read), my4to (not descriptive)
Illegal examples: 4sale (starts with number), sales tax (contains space), sales' (invalid character)
Expressions and Operators
Expressions combine values and operators to perform calculations. RAPTOR follows a specific order of operations:
- Functions first
- Parentheses
- Exponentiation (^ or **)
- Multiplication and division (left to right)
- Addition and subtraction (left to right)
Built-in operators include basic math (+, -, *, /), exponentiation (^), remainder (rem or mod), and functions like sqrt, log, abs, and trigonometric functions.
You can also manipulate text using the + operator to join strings:Full_name ← "Omar" + " " + "Ali"
Making Your Programs Understandable: Comments
Comments are notes to human readers that explain what your code does. They’re ignored by the computer but invaluable for anyone reading your program – including future you!
Add comments by right-clicking a symbol and selecting “Comment.” Use comments for:
- Programmer headers (who wrote it, when, what it does)
- Section descriptions (marking major program parts)
- Logic explanations (clarifying complex or non-standard code)
Getting Started
The beauty of RAPTOR is that you can start programming immediately. Begin with the Start symbol, add Input, Assignment, and Output symbols between Start and End, and watch your program come to life visually.
Remember the three basic components of any program:
- INPUT: Get the data you need
- PROCESSING: Manipulate that data
- OUTPUT: Display your results
With RAPTOR, you’re not just learning a programming language – you’re learning how to think algorithmically. These problem-solving skills transfer to any programming language you might learn in the future.
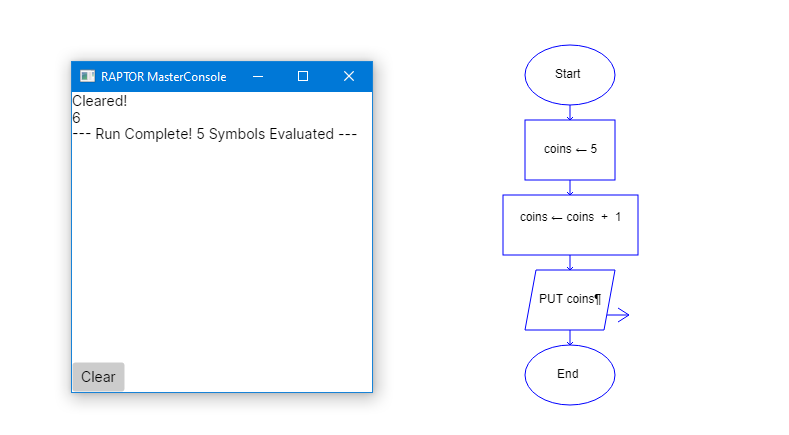
Example one:
Download RAPTOR, open the environment, and create your first flowchart. Happy programming!
Download RAPTOR Avalonia installer for Windows(07/10/2025)
Download Windows RAPTOR latest version (11/19/2019)
Download Mac RAPTOR Avalonia (07/10/2025)
Download ZIP of RAPTOR Avalonia (for Linux) (07/10/2025)
Mac Users
If you don’t have the .NET Runtime installed, get it from Microsoft. You want .NET Runtime 8.0. You may need to install libgdiplus.
To install libgdiplus, in a terminal window type “brew update” then “brew install mono-libgdiplus”
The newest version comes as a ZIP file rather than an installer. Unzip this on your Mac, then open a terminal window, cd to the appropriate folder and type “dotnet raptor.dll”
Here is a YouTube video describing steps to install RAPTOR on an ARM Mac
More information on Raptor Official page: https://raptor.martincarlisle.com/